Creating a New Reminder
Creating a New
Reminder
To get started with Reminders, you will need to have the Reminder Admin role enabled under User Functions. Here is how to enable this:
- Go to Setup > Users/Therapists.
- Click Edit next to your username.
- Select the Reminder Admin check box from the Back Office category.
- Click Save to save your changes.
Remember that an appointment must be present on the scheduler for a Reminder to be generated. You can set appointment reminders for any appointment type, such as Therapy, Evaluation, etc. from the Reminder Settings screen.
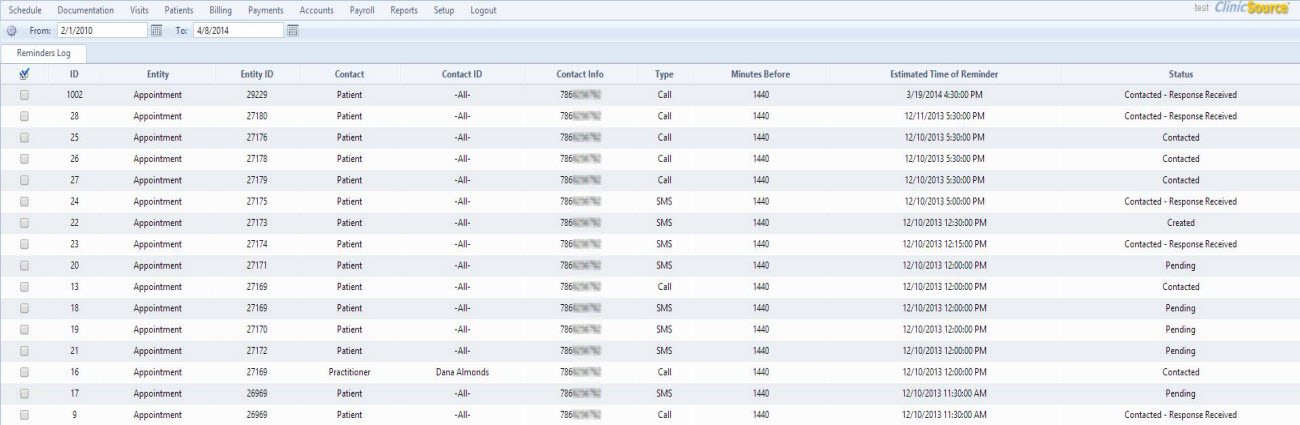
To access Reminders, click Setup, then Reminders. This will open the Reminders Log which is a running tally of all your active Reminders and applicable details. You can use the date range filter to look for reminders between specific periods of time.
Creating a New Reminder
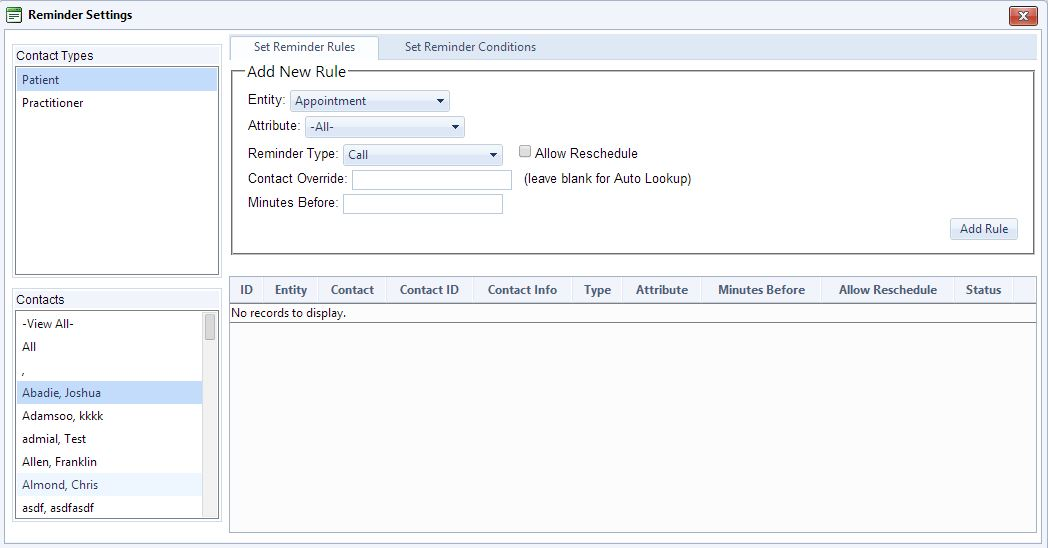
To create a new reminder, click the Reminder Settings  icon. The Reminder Rule box will appear.
Here is how to proceed with creating the new reminder:
- Select the Contact Type. This specifies the recipient of the reminder, which can be a Patient or Practitioner.
- Select a Contact. This specifies the individual patient or practitioner receiving the reminder. Alternatively, if you want to create the same reminder for all of your contacts, select All.
Next, here is how to set the reminder rule:
- Choose an Entity. By default, the Entity is the appointment you are reminding the recipient of.
- Choose an Attribute. This is the appointment type (either default or custom) of which the appointment reminder is being created for.
- Select the desired Reminder Type. This can be either Phone, SMS, or Email. (Note that there is a fee incurred for creating reminders by Phone or SMS; Email reminders are free.) In addition, you have the option to allow the recipient to reschedule their appointment via Phone, SMS, or Email by checking the Allow Reschedule box.
- Enter a contact number or email address in the Contact Override field, if desired. You can also leave this blank if you prefer to have ClinicSource look up the recipient contact information automatically.
- Enter the amount of minutes prior to the appointment you want to set the reminder for in the Minutes Before field. For best results, enter a number of minutes at least several hours in advance of the appointment, e.g. 1440 minutes (24 hours), 2880 minutes (48 hours), 4320 minutes (72 hours).
- Click Add Rule. The reminder rule and all applicable details will now be visible in the bottom box.

To toggle the Active or Inactive status of a reminder, click the check mark under Status (see above). A green  indicates the reminder is active. If it is clicked on, the green will become a red
  , indicating the reminder rule has been set to Inactive.
To delete a reminder, click the Delete  button.
Once you return to the Reminders Log, you will see any reminders that have been created by the reminder agent related to the reminder rules. Each reminder row in the Reminders Log represents an email, text message or phone call made to a recipient. Note that the reminder agent will create reminders for a given appointment within a one hour window prior to the reminder time. Hence, after creating a new reminder rule a new reminder will appear in the Reminders Log only after it is time to contact the reminder recipient. For example, if a patient appointment was scheduled for 12 noon tomorrow and a reminder rule was set for 24 hours before, you would see a reminder created in the Reminders Log around 11:00 today for that appointment.
Created with the Personal Edition of HelpNDoc: Full-featured Help generator